This post describes how to make a robot which is controlled using the EyesBot Driver iOS app, which is free and in the Apple app store.
Notice: This post involves working with electronic components, building a robot, and your mobile device. If you injure yourself or someone else, start a fire, damage or destroy your iOS device or anything else, you are responsible. We take no responsibility for your use of the information contained in this blog, you use this information at your own risk.
Indended audience: This post is intended for makers, electrical engineers, and robotics hobbyists. If you do not know how to safely handle batteries, electricity, hardware, and software, please don't continue. This robot is not intended to be used unattended. It should only be used in a safe place away from other people, traffic, fire, hazardous conditions, things that can be knocked over, animals, or other conditions that may present a risk.
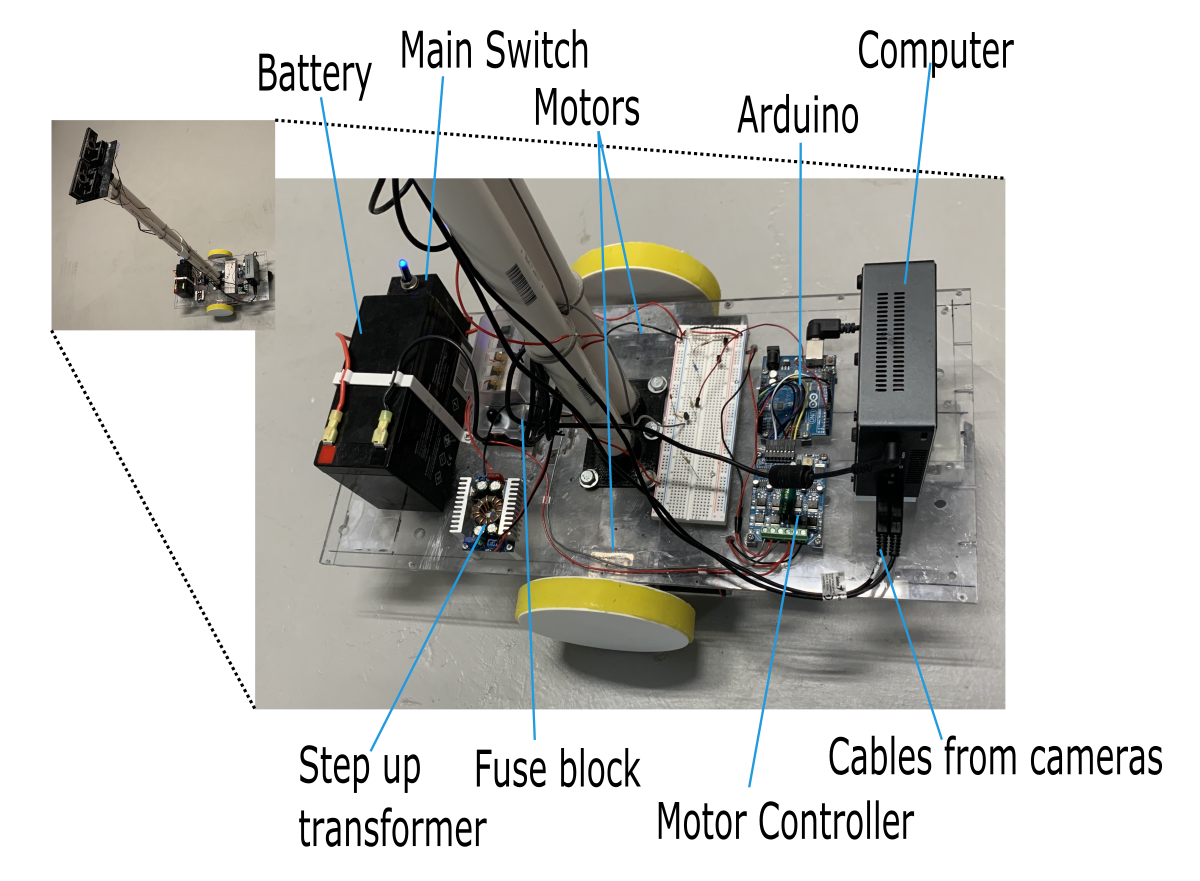
Here is an example shopping list for some of the parts, these parts cost about US$250.00, but the computer wheels, wire, and platform need to also be added. The prices will vary according to your location, this is only some suggestions as a starting point and example.
| Item Name | Number | Unit Price | Source |
| Motor controller | 1 | $15.79 | Amazon |
| Arduino | 1 | $23.00 | Amazon |
| Step up power supply | 1 | $4.49 | Amazon |
| Motors | 2 | $29.99 | Amazon |
| Cameras | 2 | $36.99 | Amazon |
| Fuse block | 1 | $15.98 | Amazon |
| Battery | 1 | $23.26 | Amazon |
| Switch | 1 | $29.70 | Amazon |
| Capacitor | 1 | $5.49 | Amazon |
You will also need a computer with at least 3 USB ports (two for the cameras and one for the arduino), which is likely the most expensive part, plus plastic, poles, and wire to complete the robot. Everything in this posts assumes you are using Linux (preferably Debian). If you will later add a powered speaker, you will likely need one extra USB port for power.
The purpose for creating this robot was to have a platform for working with machine learning in the physical world rather than purely software. In connection with this, I will include future posts related to getting the robot to interact via voice and learn about its surrounding visually. If you share these interests, please follow me on YouTube, where I will be posting the videos.
There are three components to install:
After your setup is tested, you can add the startup for the control-server.js to a startup script so that it is available when the robot reboots. This is a great guide to starting services or applications on startup for a Linux system.
The connection between the various components is shown in the following sequence diagram:
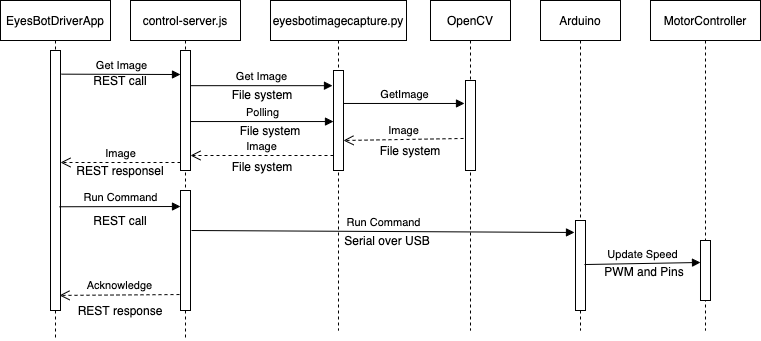
Explanation of diagram to be added
The are the following types of commands sent from the app to the robot:
 Computer vision
Artificial intelligence
Effecting the physical world
Our robot controller app is available in the app store and will be be available soon for Android