This post discusses how to make a robot based on the EyesBot app and a RedBear Labs Blend Micro. The app runs on an iOS device and communicates with the Blend Micro using Bluetooth LE. I gave a talk related to this at the January 22, 2105, XCoders Meetup in Redmond, Washington
Note: electronics may pose hazards including damage to the electronics, your possessions, fire, injury, or death. You use the information contained in the post at your own risk.
The following video shows the app in action
The parts list is:
| Item Name | Number needed | Unit Price | Source |
| Blend Micro | 1 | $27.00 | Red Bear Labs |
| GM-9 Motor | 2 | $8.50 | Solarbotics |
| Schottky Diode | 1 | $0.43 | Mouser |
| SPR-39MVWF Dual State LED | 1 | $0.65 | Mouser |
| Motor Driver L293D | 1 | $4.13 | Mouser |
| 3.5MM terminals | 3 | $0.65 | Mouser |
| 47 Ohm resistors | 2 | $0.65 | Mouser |
| 150 Ohm resistors | 4 | $0.10 | Mouser |
| 82 Ohm resistor | 1 | $0.12 | Mouser |
| 100K Ohm | 1 | $0.21 | Mouser |
| 1M Ohm resistor | 1 | $0.10 | Mouser |
| 20K Ohm resistor | 2 | $0.10 | Mouser |
| KSP13TA NPN Transistor | 2 | $0.25 | Mouser |
| 0.1 uF capacitors | 2 | $0.31 | Mouser |
You will also need a power source and some headers, unless you want to solder the Blend Micro and Motor controller directly to the board
Blend Micro Code
The Arduino sketch is fairly simple and you can download it here. The communications between the iOS device and Blend Micro take place on a pair of Bluetooth mutable characteristics used for TX/RX, creating a virtual UART over BLE. The most difficult thing is getting the Arduino IDE set up to work with RedBear Labs Blend Micro, which as of this writing doesn't work with Arduino IDE 1.6 (you'll need 1.0.x). The instructions are http://redbearlab.com/getting-started-blendmicro/
Board
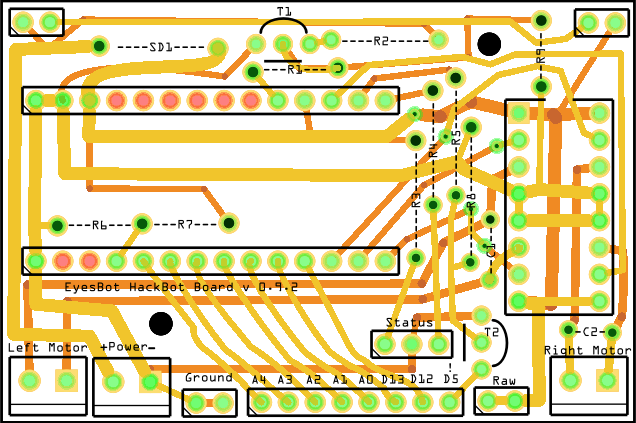
You can setup the components on a breadboard, or you can purchase a board we have designed and made available on OSH Park. We do not warranty that the board is safe to use or will be useful for any specific use. If you make boards at home, you can use the PDF stencils, otherwise you can order the boards from OSH Park. The following image show a PNG of the board from Fritzing. The values of the components are:
SD1: This is where the Schottky Diode goes
R1: This is a 150 Ohm base resistor
R2: 82 Ohm resistor for the white LEDs
R3 and R4: These are 47 Ohm resistors for the dual color state LED
R5: This is a 150 Ohm base resistor
R6 and R7: These are optional 100K Ohm and 1M Ohm resistors to form a volage divider so you can measure the
voltage of the battery safely using the A5 pin
R8 and R9: 20 KOhm pulldowns on transistor bases
C1 and C2: These are 0.1 uF capacitors across the motor leads to suppress motor hash
T1 and T2: These are NPN Transistor to drive the lights and the D5 pin, respectively. The D5 pin can be driven
using Javascript.
Status: This is a two color LED to show the Bluetooth connection state of the Blend Micro
The terminal blocks go into the stenciled left and right motor area and the power area
Along the bottom for the power, A4...!D5, and Raw stenciled areas, you can solder headers so that you can
use the respective pins on the Blend Micro. The ! lets you know that D5 is a sink
If you may be interested in buying a presoldered board, please contact us. If there is enough interest, we'll put together a small run and sell some boards.
Programming the behavior of the robot
The EyesBot app enables you to use Javascript to program the robot. The Javascript is run in your browser, but the files are stored on the iOS device on which the EyesBot app is running. There is a reference for the functions that can be called and some example code in the reference manual. You can also see a specific example of using this Javascript library for computer vision in another blog post.
 Computer vision
Artificial intelligence
Effecting the physical world
Our robot controller app is available in the app store and will be be available soon for Android