Using robots for mapping can generate huge amounts of robot sensor data. This post will be about how to
use Cassandra as a data store for the type
of Big Data storage needs that persistence of robot sensor data can create. The
complete stack that was used for developing the application that is the subject
of this blog post is:
Cassandra - Data store
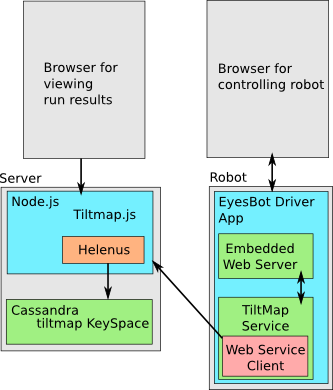
Node.js - Web front end for datastore, interacts with Cassandra using Helenus. Presents both a REST API front end and a web front end for humans.
Browser - For two distinct use cases: When a human user is viewing tiltmap runs and also to create the interactivity for the front end for the EyesBot Driver robot controller app
iOS - The bulk of the logic, includes video streaming, presenting the web interface and dealing with converting commands from the web interface to a form the robot body can
understand. Discussed in many otherblogposts
Diagrammatically the system looks like this:
The CQL, Javascript for Node.js and HTML/css and Javascript for the web interface is available in a
zip file.
The following short video shows the mapping behavior:
Cassandra
First, you'll need to get Cassandra setup. These instructions are accurate and brief.
Next you'll need to create a keyspace, which is similar to creating a database in a conventional RDBMS, and a
table, called a column family in earlier versions of Cassandra:
create keyspace tiltmap with replication =
{'class': 'SimpleStrategy', 'replication_factor':1};
CREATE TABLE run (
run_name text,
PRIMARY KEY (run_name)
)WITH comment='distinct runs, corresponds to run_name
in tiltmeasurement'
AND read_repair_chance = 1.0;
CREATE TABLE tiltmeasurement (
run_name text,
x_location float,
y_location float,
bearing_degrees float,
x_tilt float,
y_tilt float,
z_tilt float,
PRIMARY KEY (run_name, x_location, y_location)
)WITH comment='Records of x y z accelerometer readings
at a given locations'
AND read_repair_chance = 1.0;
When your Cassandra instance is set up, you'll need to start both the cassandra instance
and CQL client (so you can see if information is being inserted into your database). From the
directory in which Cassandra is installed:
sudo ./bin/cassandra -f
./bin/cqlsh
Node.js
Once your Cassandra instance is going, you will need to get the Node.js code, which is
in the TiltMap.js file in the zip file.
If you don't have Node.js setup, you'll need to set it up first.
The TiltMap.js file requires Helenus and express, which you can install by creating a directory for the
TiltMap project, copying TiltMap.js into it, and then running the following two npm commands to install
Helenus and Express:
npm install express
npm install helenus
The first thing to notice about the code in TiltMap.js is the persistence code which
relies on Helenus:
var helenus = require('helenus');
var pool = new helenus.ConnectionPool({
hosts:['localhost:9160'],
keyspace:'tiltmap',
cqlversion:'3.0.0'
});
pool.connect(function(err, keyspace){
if(err){
throw(err);
} else {
}
});
Helenus is very easy to use, you will likely be able to copy and paste the code above
and it will work if you did the default Cassandra setup and have created the tiltmap
keyspace.
The second thing to notice about the code in TiltMap.js is the way that incoming
requests are handled
The iOS project is not included in the zip file, as the
code for EyesBot is mostly closed source. The Objective-C code that coordinates the moving of the
robot and takes the accelerometer code is included below, though. The three things that the iOS
code needs to do is:
Move the robot
Read the accelerometer
Send the accelerometer readings to the web service
The robot motion is controlled using the LightCodedOutput class, which converts messages
about left or right velocity and the status of the headlights to a pattern of white or
black squares on the screen, which are in turn read by photodiodes in the robot body. This
is covered in some detail in another post.
The way that the choreography is done is covered in an article about obstacle avoidance
Gathering the accelerometer data is very easy:
//include the CoreMotion.framework before adding any of
//this code in the .h file:
#import
//as ivars
float xTilt;
float yTilt;
float zTilt;
//as property
@property CMMotionManager *motionManager;
//in the .m file
@synthesize motionManager;
//in startup code, for example, init
self.motionManager = [[CMMotionManager alloc] init];
self.motionManager.accelerometerUpdateInterval = 0.1;
self.operationQueue = [[NSOperationQueue alloc] init];
if ( ![self.motionManager isAccelerometerAvailable] ) {
return;
}
[self.motionManager startAccelerometerUpdatesToQueue:
self.operationQueue
withHandler:^(CMAccelerometerData *accelerometerData,
NSError *error) {
[self accelerometerUpdateWithData:accelerometerData
error:error];
}];
//this is the callback that gets the accelerometer
//readings
- (void)accelerometerUpdateWithData:
(CMAccelerometerData *)accelerometerData
error:(NSError *)error {
if ( error ) {
return;
}
CMAcceleration acceleration =
accelerometerData.acceleration;
if(acceleration.x>xTilt) xTilt = acceleration.x;
if(acceleration.y>yTilt) yTilt = acceleration.y;
if(acceleration.z>zTilt) zTilt = acceleration.z;
}
Sending the accelerometer data to the web service created with Node.js is
quite easy (there are frameworks available for this also, but the code is
quite simple so it is done without a framework here)
//this code create the timer and sets it going.
if(requestTimer==nil){
dispatch_async(dispatch_get_main_queue(), ^{
requestTimer =
[NSTimer scheduledTimerWithTimeInterval:
self.timingInterval
target:self selector:@selector(sumbitNextReading:)
userInfo:nil repeats:YES];
});
}
-(void)sumbitNextReading:(NSTimer *)timer{
//there is is a bunch of choreography code that has
//been omitted that controls when to send, this shows
//how to send, you will need to add your own
//choreography code
if(timeToSendReading){
//Web Service Call
if(comingBack){
xLocation -= 10;
}
//send accelerometer data periodically to web service
NSString *theRequest = [NSString stringWithFormat:
@"%@addtiltmeasurement?runname=%@&xlocation=%f&
ylocation=%f&xtilt=%f&ytilt=%f&ztilt=%f",
self.webServiceURL, runName, xLocation, yLocation,
xTilt, yTilt, zTilt];
NSURLConnection *theConnection =
[[NSURLConnection alloc]
initWithRequest:[NSURLRequest
requestWithURL:[NSURL URLWithString:theRequest]
cachePolicy:NSURLRequestUseProtocolCachePolicy
timeoutInterval:60.0]
delegate:self];
if(!comingBack){
xLocation += 10;
}
if(!theConnection) {
NSLog(@"theConnection is NULL");
}
xTilt = 0.0;
yTilt = 0.0;
zTilt = 0.0;
}
}
Next steps
Most of this same code is being evaluated for storing visual signatures of
locations, to enable robots to visually map locations.
The purpose for creating this robot was to have a platform for working with machine learning in the
physical world
rather than purely software. In connection with this, I will include future po...
Javascript can be used to get a matrix of pixels which can be used for computer vision. This post looks
at a very simple application, which can look for a color palette and infer the presence of...
This post discusses an easy algorithm for obstacle detection and avoidance. The techniques and
code discussed in this article are related to two former posts........
One of the behaviors that is being evaluated for inclusion in EyesBot Driver is mapping, which can
generate large amounts of robot sensor data in a bursty manner. This post will be about how to
...
I couldn't finding an article which contained source and discussion for running a CIM motor from a Jaguar
controller using an Arduino, so if you are looking for this information, here it is. The ...
In an earlier post I described how to make a robot which is controlled using the free EyesBot Driver iOS app.
That robot required quite a bit of soldering and left the design of the robot chassis...
I have a previous post about using web services from robots. This post is focused on using a web
service from EyesBot Driver robot controller app. The audience for this particular blog post is...
One of the behaviors that make sentient beings appear sentient, is the ability to react to
the environment. In the case of reacting to an object, it's easy to mimic the behavior of a sentient
...
My last post was about using web services with robots and I recently read a post
in the Linkedin group "Robotics Guru" about the new MyRobots.com cloud monitoring
service from RobotShop (from wh...
I'm starting to add autonomy to the robots that have been the main subject of this blog and one of the major
considerations of permitting autonomy is how to coordinate and modify the behavior of ...
This is one of my infrequent technical posts, but related to one of my products.
I've written a few home/business security related apps that can monitor your residence or
business while you are ...
This post describes how to make a robot which is controlled using the EyesBot Driver iOS app (which should
be in the app store around June 3, if it passed the App Store review process without issu...
This is one of the occasional technical articles I'll be posting. The solution that is described
below stems from a problem that a few friends and I were discussing at lunch one day in Boulder, Col...
I looked at a few options for measuring distance for a small robot I'm working on, but it occurred to
me that I should be able to have the robot simple shine an LED on something, and, based on t...
I looked at a few options for measuring distance for a small robot I'm working on, but it occurred to
me that I should be able to have the robot simple shine an LED on something, and, based on t...
I built a robot which uses an iPod as it's brain and the questions of how to interface
the iOS device to the hardware was probably the most difficult early decision in the design
process. There ...
I use transistors frequently to drive components that take more current than an Arduino can
supply, and infrequently to amplify signals. This post attempts to answer two really common
questions ...
Several of our software products, which run on iPhones, iPods, and iPads, use simple computer vision
based algorithms to help to alert the user of potential security issues at their home or office...
This is related to the motion tracking blog post that I posted to my company's blog a few weeks ago, and builds on
the same source code. The problem I was trying to solve was how to teach an auto...
The EyesBot line of apps has some degree of autonomy and ability to influence and be influenced by its
environment - for example, EyesBot Watcher detects motion, tracks motion with it's "Eyes" and...


 Computer vision